Showing posts with label DIY. Show all posts

Thursday, April 29, 2010

Cupcake Flags


As most of you already know, I have a thing for cupcakes....as evidenced here and here. So, of course when I saw these cupcake flags on Peach and Pearl I got very excited thinking about having another cupcake party! This would be a fun and relatively easy DIY project that adds lots of personality to your cupcakes...


Image via Peach and Pearl

Monday, November 30, 2009

Thanksgiving Recap

I hope you had a wonderful Thanksgiving...mine was nice and relaxing once all the cooking and table decorating was done! I definitely ate way too much, so of course the diet is starting today :)
Below are a couple of photos I took of my Thanksgiving table. Its a mix of rustic and elegant...one of my favorite combos. As you saw last week, I spray painted pumpkins gold for place card holders, and I also used some extra pumpkins for the centerpiece. I combined my wood plates(used as chargers) with my grandmother's china, and I just loved how the china accented the gold pumpkins. Finally, I picked some bittersweet from the side of the road and used that in the center of the table, and the red berries brought out the color of the table runner's border just perfectly.

.

I'm always a little sad when a holiday ends, but at least we have Christmas to look forward to now! I've got my tree up and its mostly decorated...just needs a few finishing touches. Have you started decorating yet??


Tuesday, November 24, 2009

Thanksgiving DIY Project, part II

I don't think I have mentioned this before, but I'm a little obsessed with burlap (hence the burlap background on my blog). To me, its the perfect element to add to a rustic (and chic) table. When I saw these burlap table runners on Style Me Pretty, I knew I had to make one for my Thanksgiving table. BUT, there was one big obstacle in front of me... I don't know how to sew! Unfortunately, I didn't pay much attention to the sewing lessons my grandmother gave me when I was little. Hindsight is 20/20, huh?
.
.
.
I decided that instead of sewing fabric to the edge of the runner, I would glue it! Ok, I know that sounds unprofessional, but this project is all about DIY and for me that involves glue. I found a tube of clear glue that adheres to several different materials at Michael's and it worked perfectly! I was looking for a brown velvet ribbon, but had to settle for a deep cranberry instead. And lucky for me once again, I had some leftover scraps of burlap. Here is a sneak peek at the table runner...you will have to wait until after Thanksgiving to see the finished look.


Top 2 Photos via Style Me Pretty

Monday, November 23, 2009

Thanksgiving DIY Project, part I

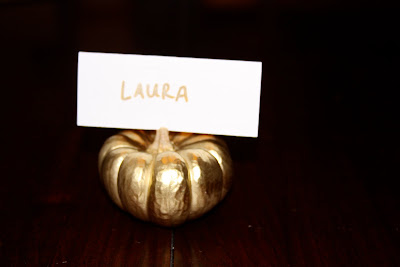
My family has put me in charge of table decorations this year for Thanksgiving, so I have been scouring all my favorite blogs and web sites to get some inspiration. I saw this adorable place card DIY project by Jenny Steffens on Style Me Pretty and I just had to try it!
.

.
Lucky for me, I had several small white pumpkins at my house that I had used to decorate for Halloween. As you can see they were starting to turn yellow, so thankfully I had not already tossed them! I put some newspaper down, covered the stems with painter's tape and started spraying...
.


.

Once the top of the pumpkins dried (about 30 minutes) I flipped them over and sprayed the bottoms.

.
.
Once the pumpkins were dry, I used a knife to cut a slit in the stems so that the name card would slide in to place.

.

I am pretty pleased with the finished product! The only thing I would change would be to get a more subtle metallic sray paint color, which would be more similar to Jenny's pumpkins. I bought all my materials - spray paint, place cards, and gold pen - at Michael's. I can't wait to see how these look on Thanksgiving day!


P.S. Today is my 100th post!! I can't believe I've hit triple digits...

Top photo via Jenny Steffens

Monday, August 24, 2009

Watermelon Cooler


I was at the dentist's office the other day and saw this July issue(2009) of Southern Living on the coffee table and decided to sneak a peak before getting called back. My subscription to Southern Living ran out a few months ago and after seeing this issue, I realized I've really been missing this great magazine! Of course the cover grabbed my eye...I'm LOVING the idea of a Watermelon cooler for a party. What a great DIY idea for adding a little special creative touch to your next party.


And, what could be more perfect than serving Watermelon Agua Frescas from your watermelon cooler?? Check out the recipe from Maria Corbalan, owner of Taco Xpress in Austin, Texas...
Watermelon Agua Frescas Recipe

yield
Makes about 5 cups

ingredients
4 cups cubed seedless watermelon, cantaloupe, or honeydew melon
1/4 cup sugar
2 cups cold water

preparation
Process watermelon, cantaloupe, or honeydew melon and sugar in a blender until smooth, stopping to scrape down sides as needed. Pour mixture through a fine wire-mesh strainer into a pitcher, discarding solids. Stir in 2 cups cold water. Cover and chill until ready to serve. Serve over ice.
I'm thinking it would be great for a party at the lake, beach or even in your backyard. Watermelons = summertime to me so you better use this idea quick, because the lazy days of summer are almost over!
Photos via Southern Living